Nov 10, 21
HPM Billink User Guide
Welcome HPM users to Billink
-Author, Glenda O’Neill – 1st March 2021
We have designed this guide to help you understand the recent changes and updates to the Helix Practice Manager system. We recommend you take the time to read this guide after your upgrade is completed. Please contact our Customer Support Department if you have any queries regarding the upgrade on 01 -4633098 or email: gpsupport@clanwilliamhealth.com.
Covered in this tutorial:
Onboarding
Dashboard
Payment Request
Patient Payment
Backdated Invoices
If you would prefer to view a video of this guide instead click here:
A PDF document of this post is available here:
This integration allows you to generate a Billink transaction and send this charge request via SMS. The patient will receive a link in the SMS to pay for their consultation. All charge requests and their status can be viewed in the Billlink dashboard. Once the patient pays, the payment will be downloaded into the patient’s chart in HPM. If you would like to use Billink, please contact our support desk (014633098) to set this up.

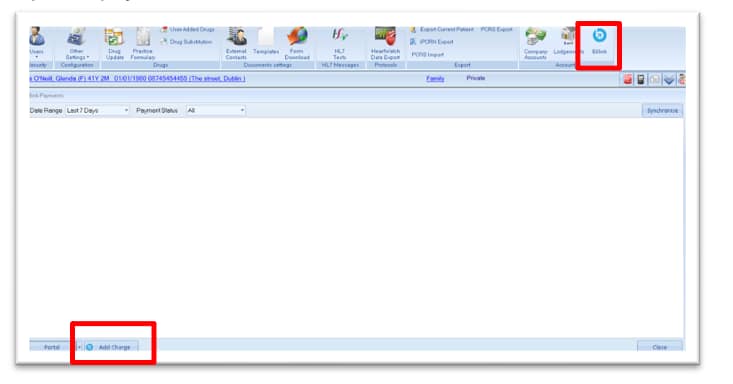
Once setup is complete, when you open HPM, you will see the ‘Billink’ button at the top of the
screen. This button appears under all of the menu options (except ‘Reports’ and ‘Help’).
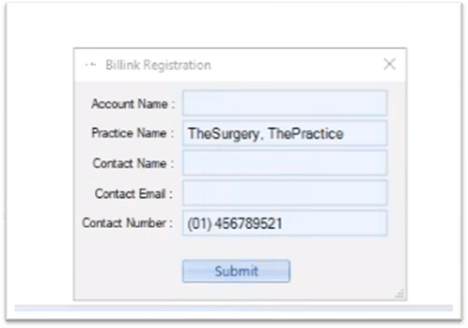
When you click this button you will get the Billink Registration window until you register your practice. Enter your Practice Details, Contact Name and Email Contact Number. Click Submit. (This only needs to be entered once and will be saved thereafter).
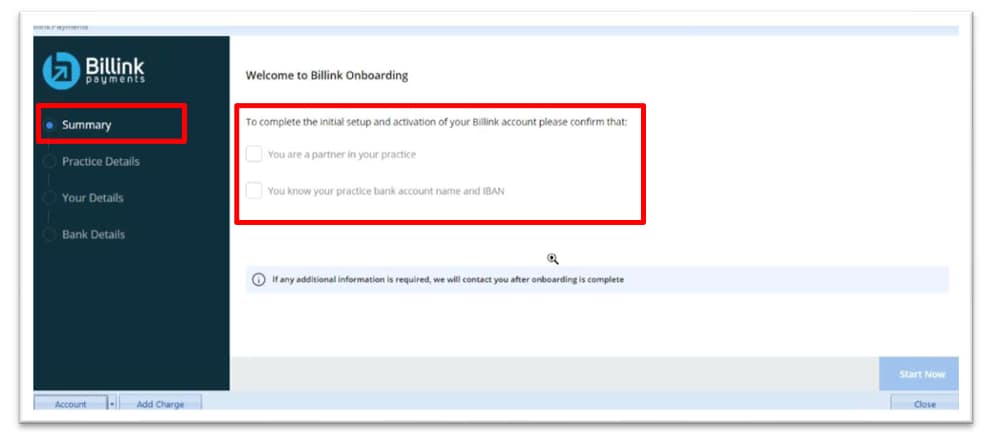
Onboarding
You must now create a Billink account by following the Billink Onboarding Screen. You must confirm ‘You are a partner in your practice’ and ‘You know your practice bank account name and IBAN to continue. Tick the boxes and click Start Now to continue.
You will be taken to the Practice Details Screen where you will enter the Practice details. Choose the checkbox that is relevant to you between Partnership and Sole Trader. Enter your Practice Name and Practice Address and enter the country code i.e. +353 followed by the Practice Phone
Number e.g. +35314633098. Click Next Step to continue. 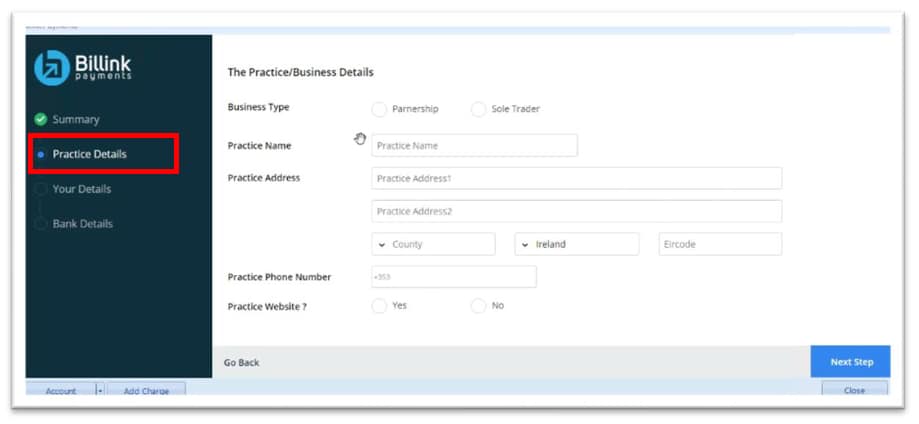
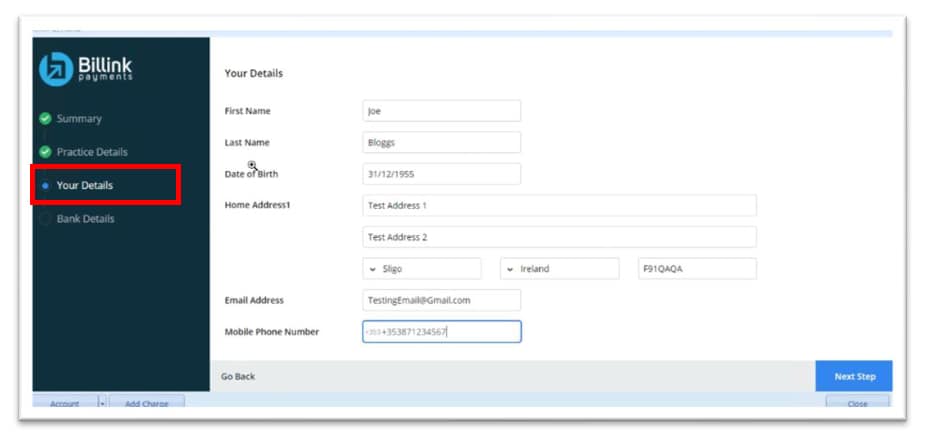
Next you will be taken to Your Details section. Here the user creating the account must enter their details. You must enter the country code i.e. +353 followed by your mobile number e.g. +353871234567.
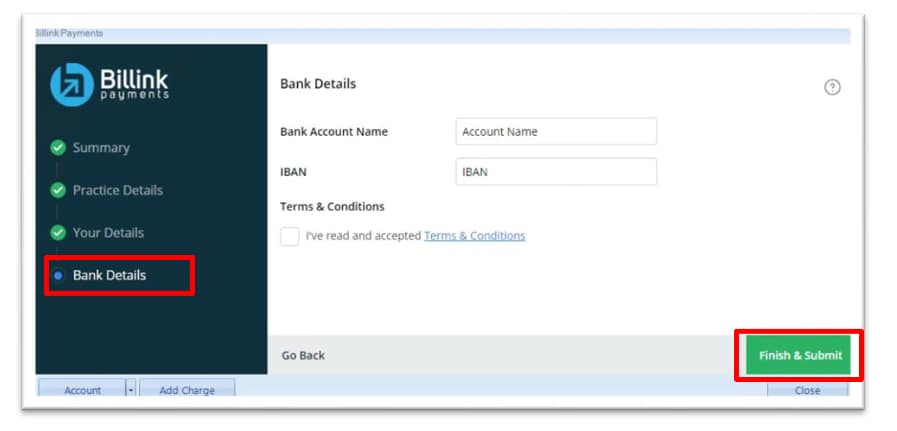
The next screen is the Bank Details Screen. Here you must enter your Bank Account Name and IBAN details. You will check the box to indicate you have read the Terms and Conditions and click Finish & Submit.
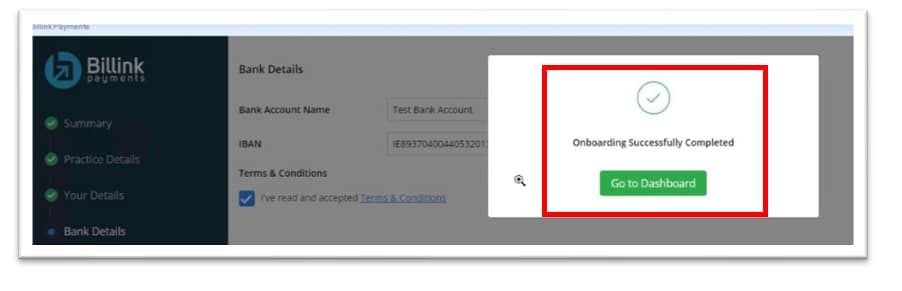
A successful message will appear once the account is created and you will have the option to ‘Go to Dashboard’.
Dashboard
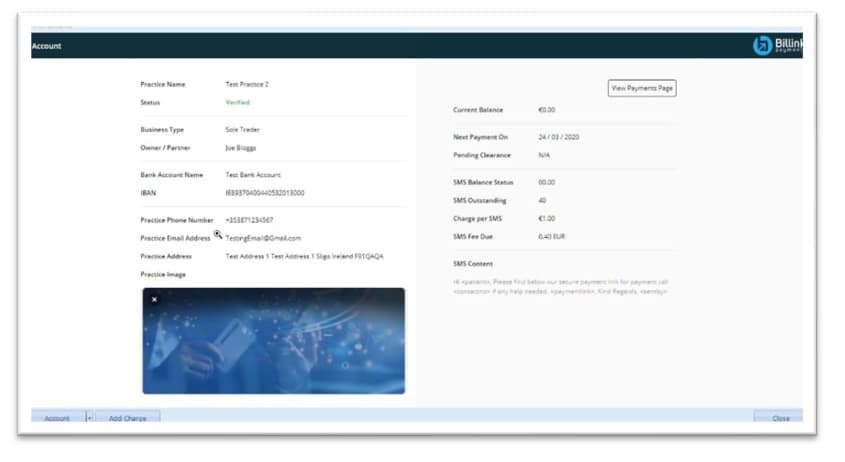
Clicking ‘Go To Dashboard’ will open the Dashboard. Here you will see all the information you have added during the ‘Onboarding’ process. You can add your own Practice Image and when you send a payment request to a patient, your image will appear at the top of the request.
Payment Request
Once the Account is created you can Click Add Charge from the Billink button on the ribbon to request a payment from a customer.
If you have a patient file open, this patient’s details will appear. If you do not have a chart open when you click the button, you will select the patient and enter the details of the payment you require.
If you have already created an invoice in the patients chart you can select the invoice and click the Add Charge button.
The patient’s mobile number will be populated from the chart if it exists. You must ensure this is correct as a link will be sent to this mobile number for the patient to pay the charge. Any mobile entered on this screen is saved back to the patients chart. The Notes section will be displayed to the patient and shown on the receipt.

After clicking Submit, details of the charges will be displayed.
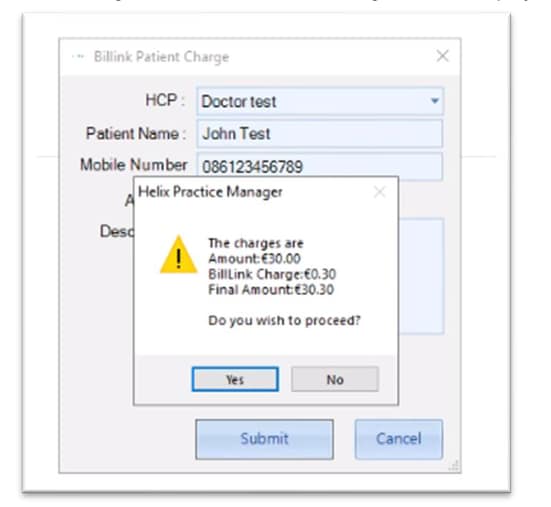
If you click ‘Yes’, then an SMS message is sent to the patient with a link to make the payment. If you click ‘No’, then no SMS message is sent and the transaction request is cancelled.
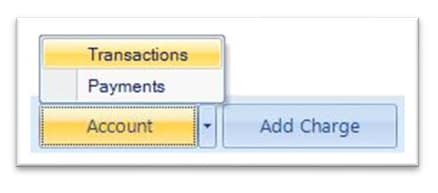
In this example, we will click ‘Yes’. The Payment Transaction will be saved. Click Account > Transactions to view all pending / processed payments.
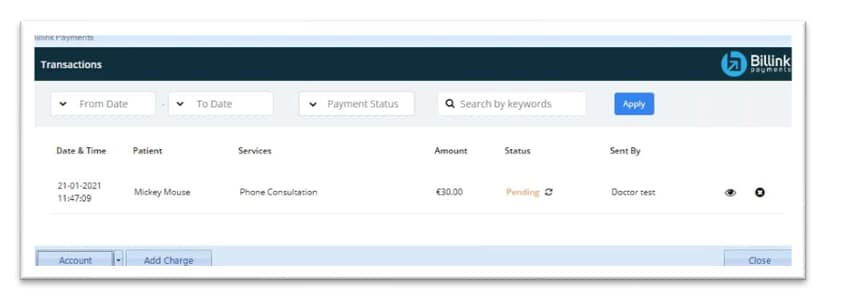
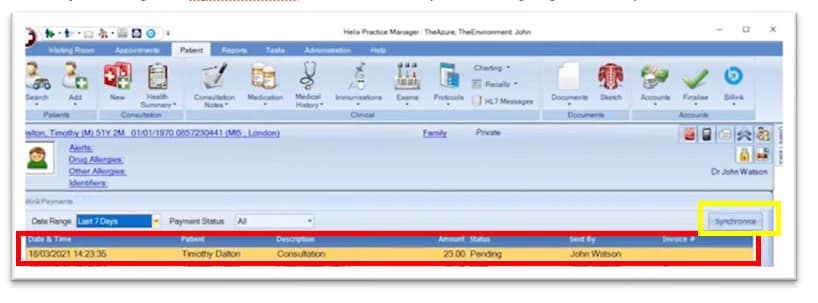
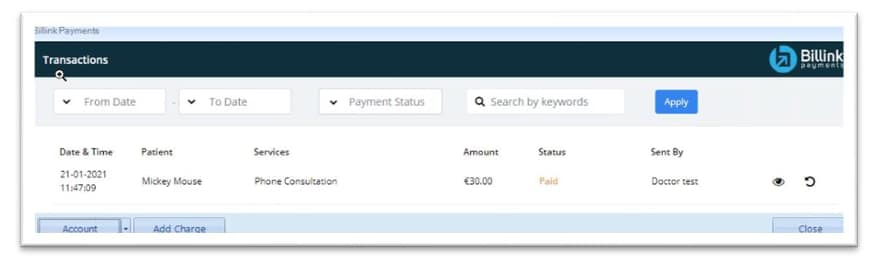
You can see the Pending Transactions in the Billink Dashboard in HPM (Click the Billink button and select Dashboard from the dropdown if in patients chart) and once the patient makes payment, it will change automatically from Pending to Paid.
Please note: this page checks for new payments once it is opened but you can force an immediate check by clicking the Synchronise Button once. (Yellow Highlight below)
Patient Payment
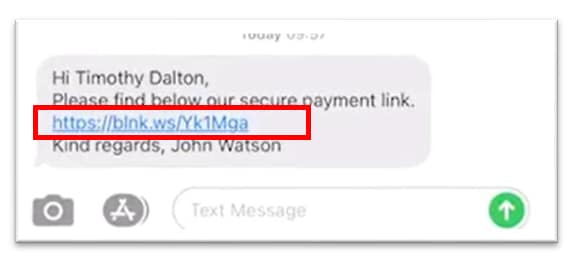
The patient will receive a text message notifying them that a payment request has been sent.

They must click the link within the message to make payment.
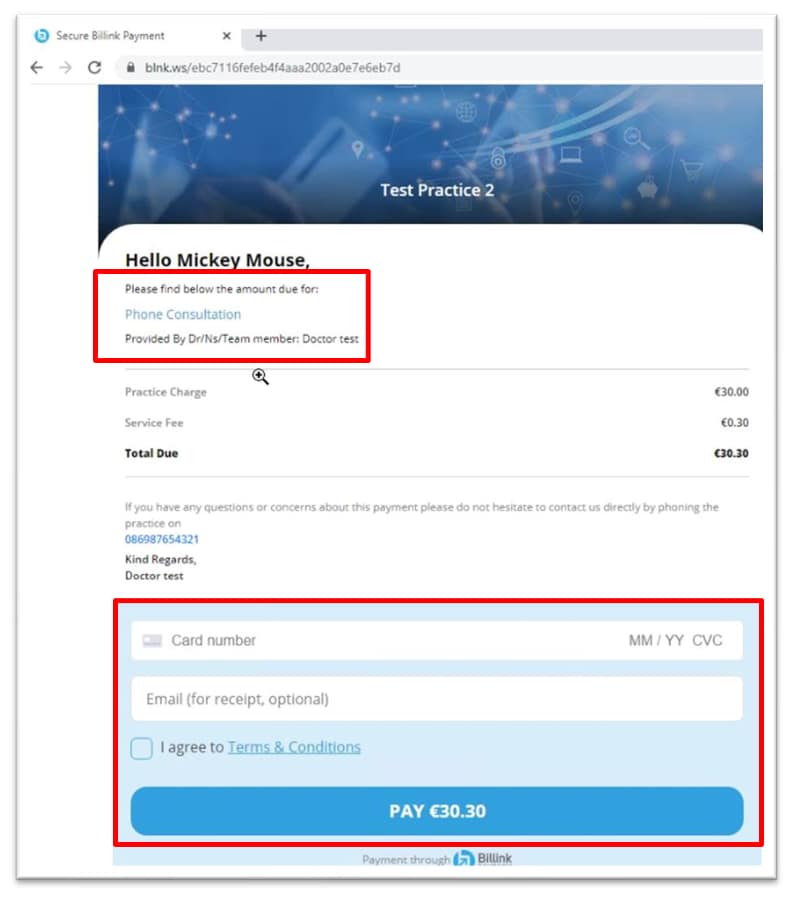
When the patient clicks the link they are taken to the Secure Billink Payment Screen. Here they will see your practice name at the top that you entered when onboarding, and if you added an image, it will also be displayed. They will also be able to see the billing type and charge you have requested. They can enter their card details and pay the fee due.
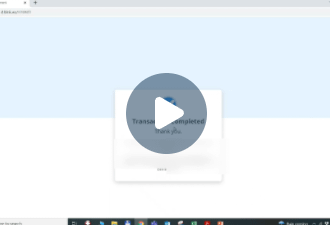
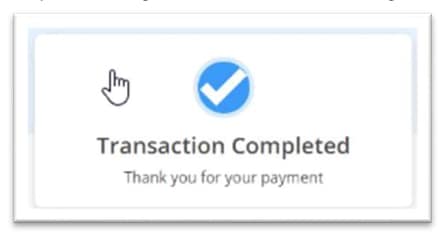
The patient will get this confirmation message once the payment has been successful.
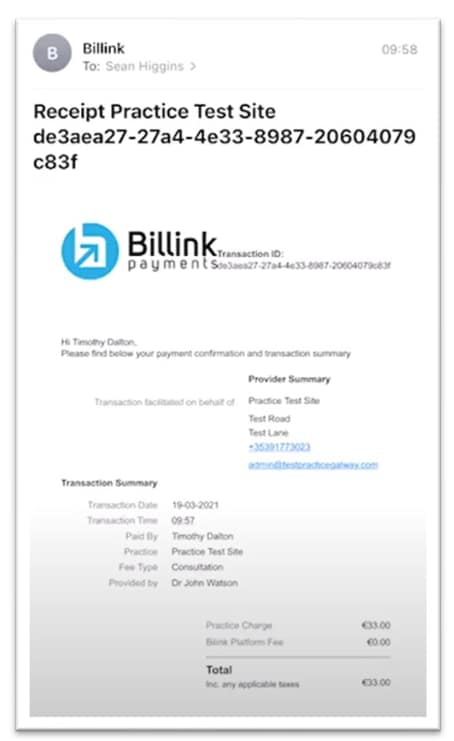
The patient will receive an email receipt if one has been requested.
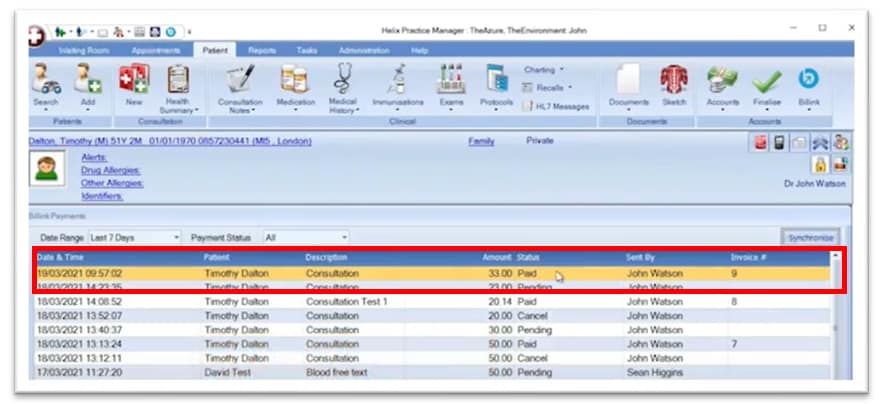
Once the payment is made and the Billlink screen is refreshed (closed and reopened) you will be able to see details of the payment taken by Billlink in your HPM system by clicking the Billink button and going to Account > Transactions. (Bottom left corner of your screen).
The status message will change from Pending to Paid in the Dashboard. The invoice and payment will be created in the patients chart.
At the scheduled monthly time Billink will transfer the payments due across to the bank account created in the Billink Onboarding and you will see these payments from Account > Payments.
Billing in HPM will work in the same way it has previously, and any payments taken through Billink will be automatically added as invoices and paid with a payment type of Online Payment. They will appear in reports, transaction statements etc in the same way they would if you added a cash or credit card payment but will show with a payment type of online payment.
Technical Trainer at Clanwilliam Health