Dec 15, 21
Health One New User Guide
Welcome new H1 users to Billink
-Author, Glenda O’Neill – 15th December 2021
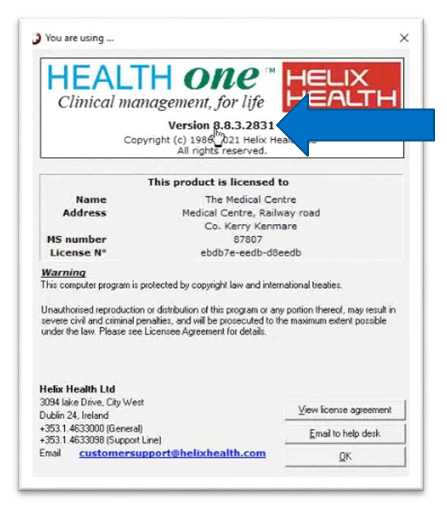
The Health One Version with this functionality available is version 8.8.3.2831 or above. You can check what version you are using by going to ‘Help’ and ‘About’.
You must also be using the NEW BILLING MODULE.
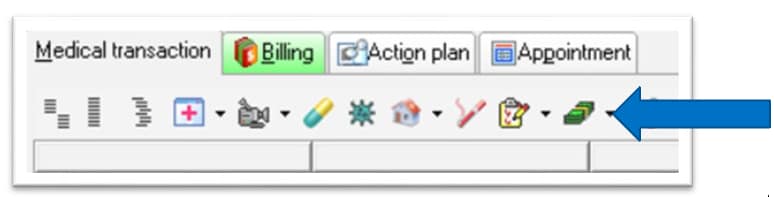
If you are unsure, if you are using the New Billing Module, when you open patient file, and click the Billing tab, the icons at the top look like this:

If you are using the Old Billing Module, the icons look like this:

To move from the Old Billing Module, to the New Billing Module, you must contact our support desk on 014633098.
Covered in this tutorial:
Billink Registration
Billink Portal/Dashboard
Payment Request
Patient’s Experience
Backdated Invoices
Billing Comments
Billink Settlement
Billink Tracking
Manually taking payment over the phone
Cancelling an Invoice
Refunds
Group Charges
If you would prefer to view a video of this guide instead click here:

A PDF document of this post is available here:
BILLINK REGISTRATION
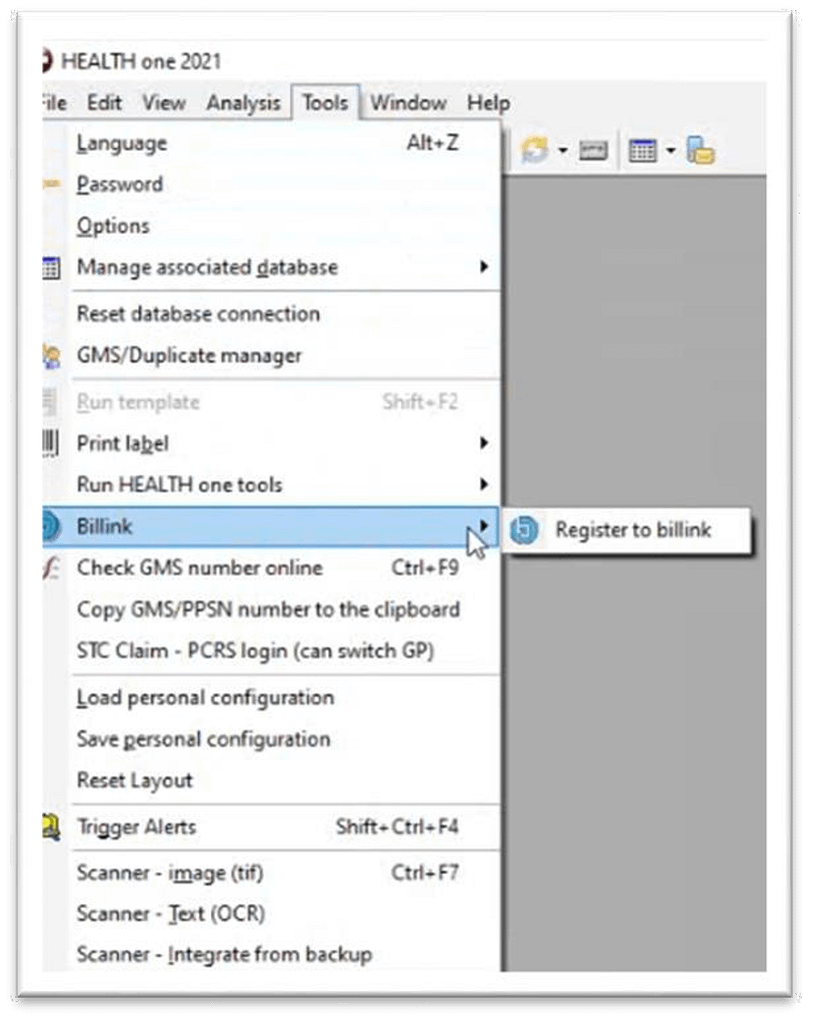
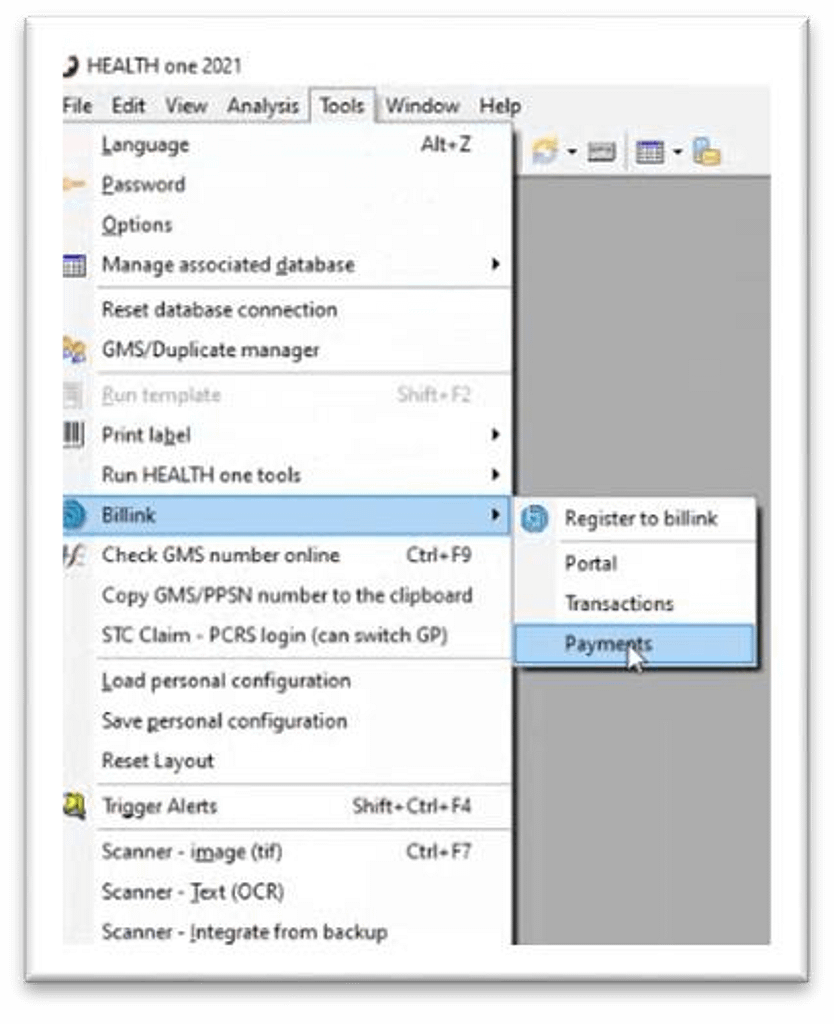
To begin, click Tools, select Billink from the dropdown menu and click ‘Register to Billink’
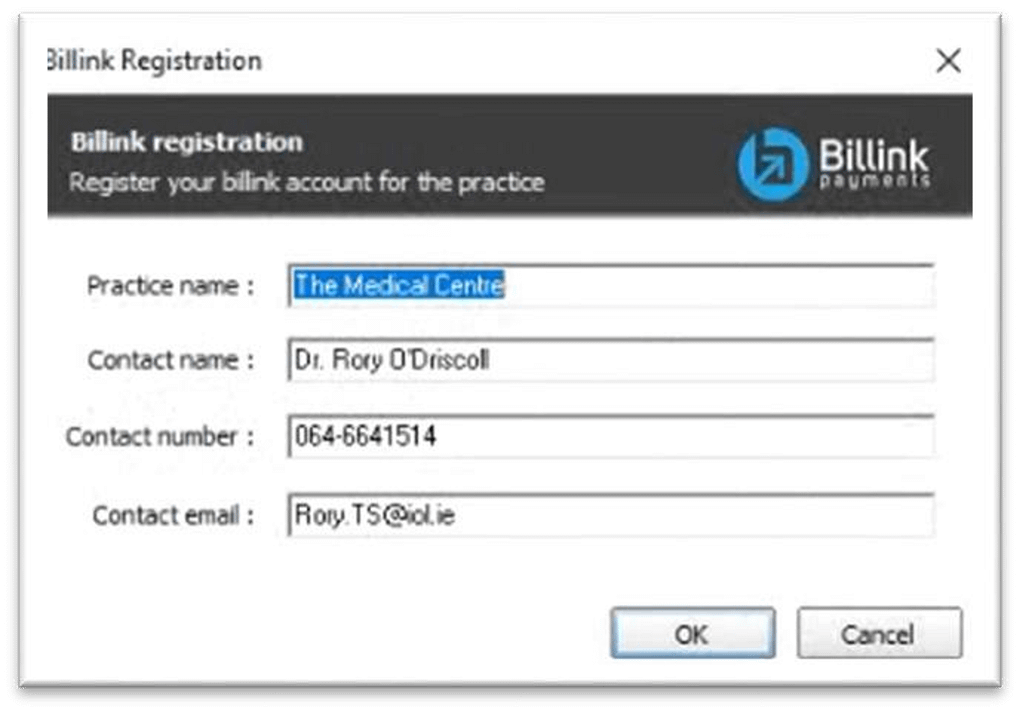
Click Register to Billink to create a Billink account which is a once off procedure where you register your practice details. You will need to enter basic information about you and the practice. Health One will take these details from your practice details but you can change them if you wish.
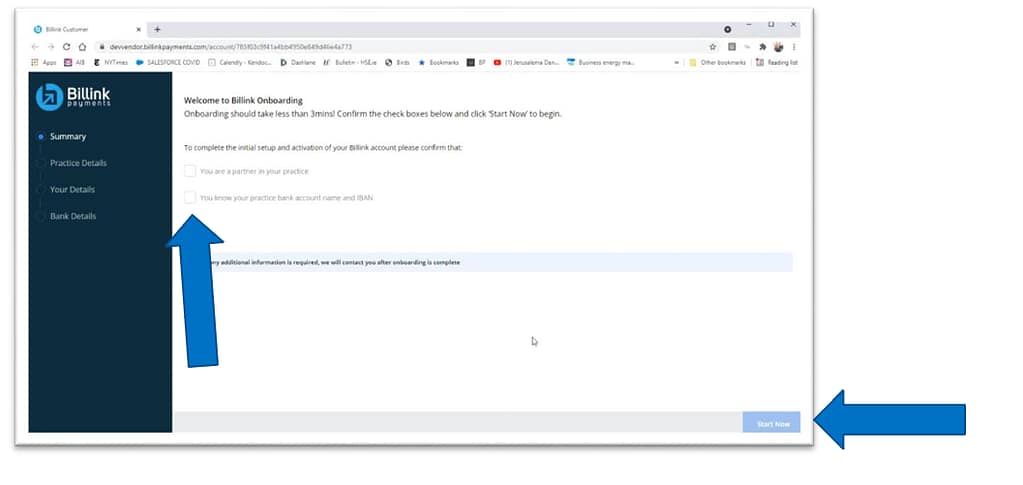
Once you have entered your details, and press ‘Ok’, Health One then connects to the Billink Online Portal where you will complete your once off registration process. You will need to confirm you are a partner in the practice and you have the practice bank account details ready to begin.
Do this by checking the boxes and clicking ‘Start Now’.
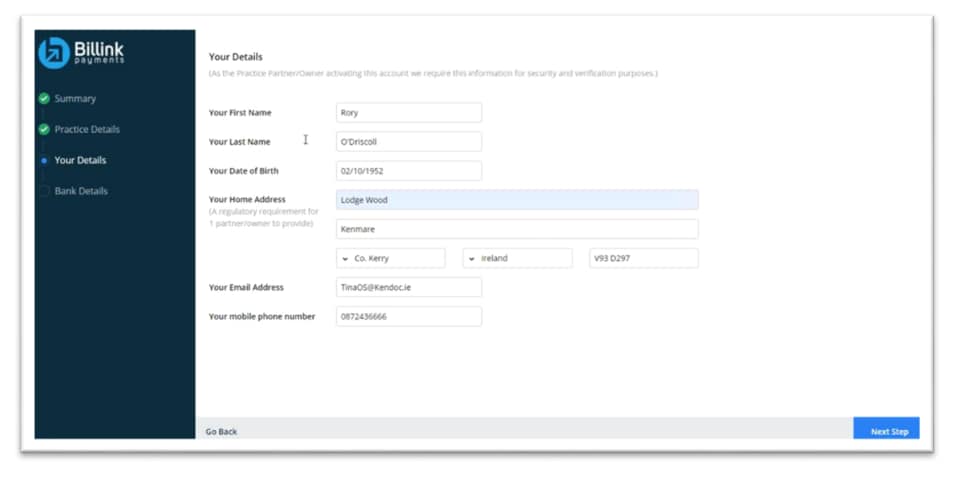
Enter the Practice Details, and click ‘Next Step’.

Fill in your details. If you chose Partner then you will need to fill out details of all partners.
Click ‘Next Step’
Read the Terms & Conditions and confirm if you agree, enter your bank account details and click Finish & Submit.
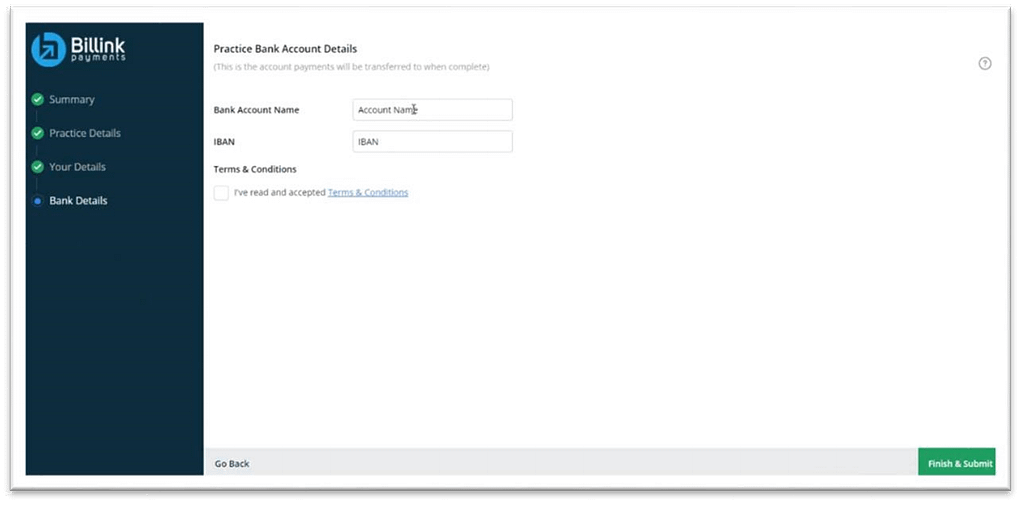
Finish and Submit’ will complete the once off registration process.

Once the Billink registration is complete you will receive a confirmation message. Clicking Go to Dashboard will open the Billink Portal.
BILLINK PORTAL/DASHBOARD
Here you will see all the information you have added during the Billink registration process. You can edit or change some of the information if you wish to do so. You can see the text message that will be sent to the patient (red arrow below) and you can change or add fields by using the Add-In’s above. (Green Arrow)
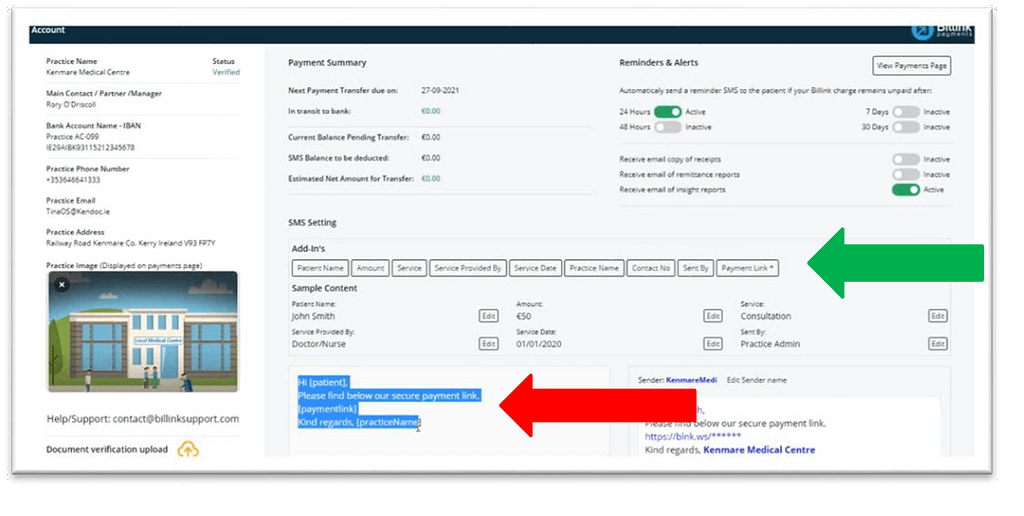
You can add your own Practice Image and when you send a payment request to a patient, your image will appear at the top of the request. Click X to remove the template image and drag and drop your new image.

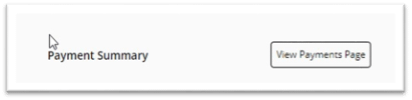
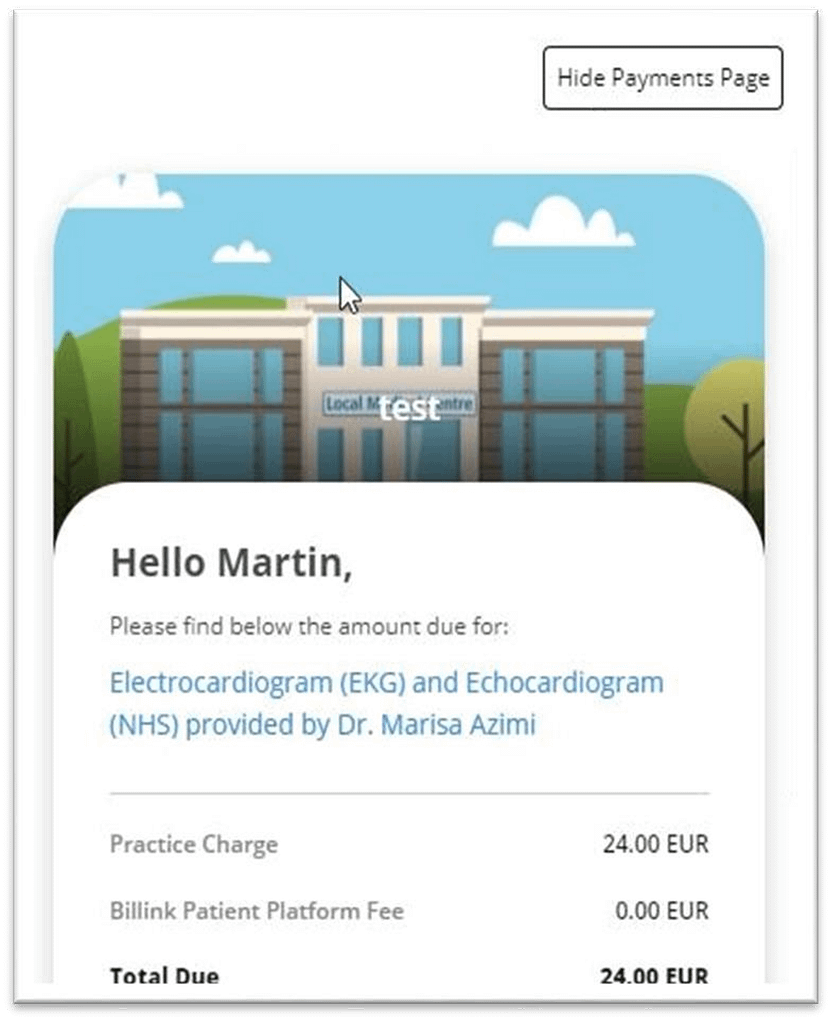
Click View Payments Page to view a preview of how the payment request link will look for the patient.
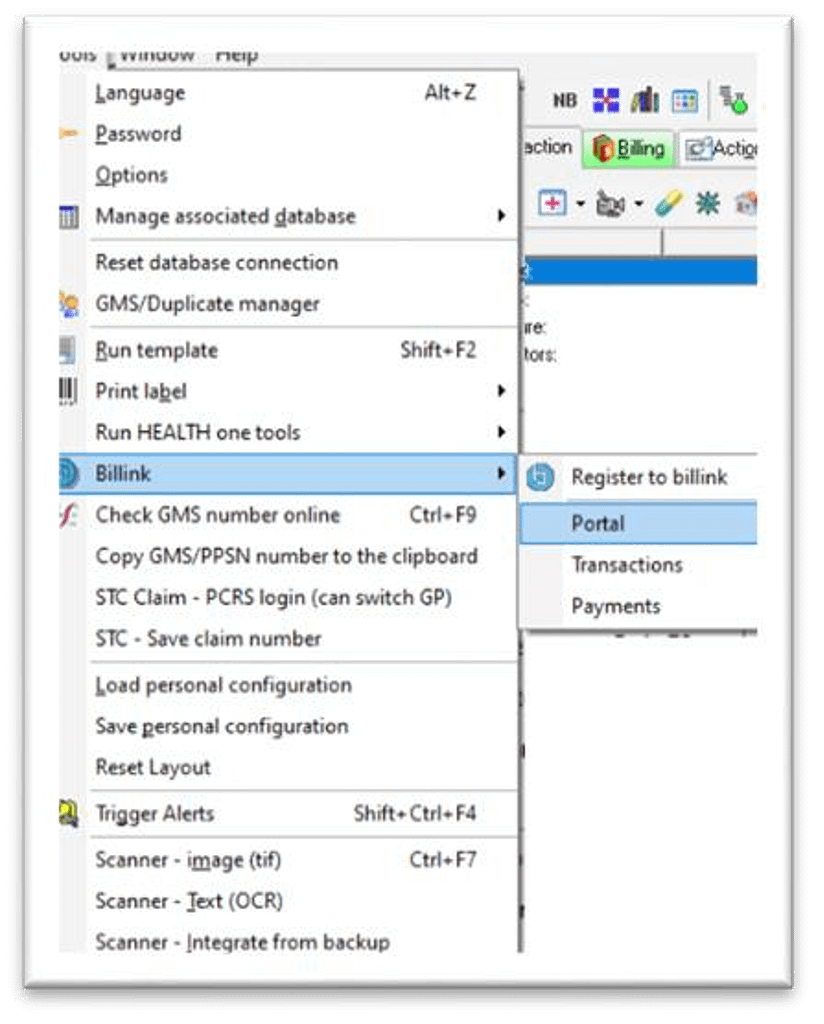
You can open the Billink Portal at any time by going to Tools, Billink, and selecting the Portal.
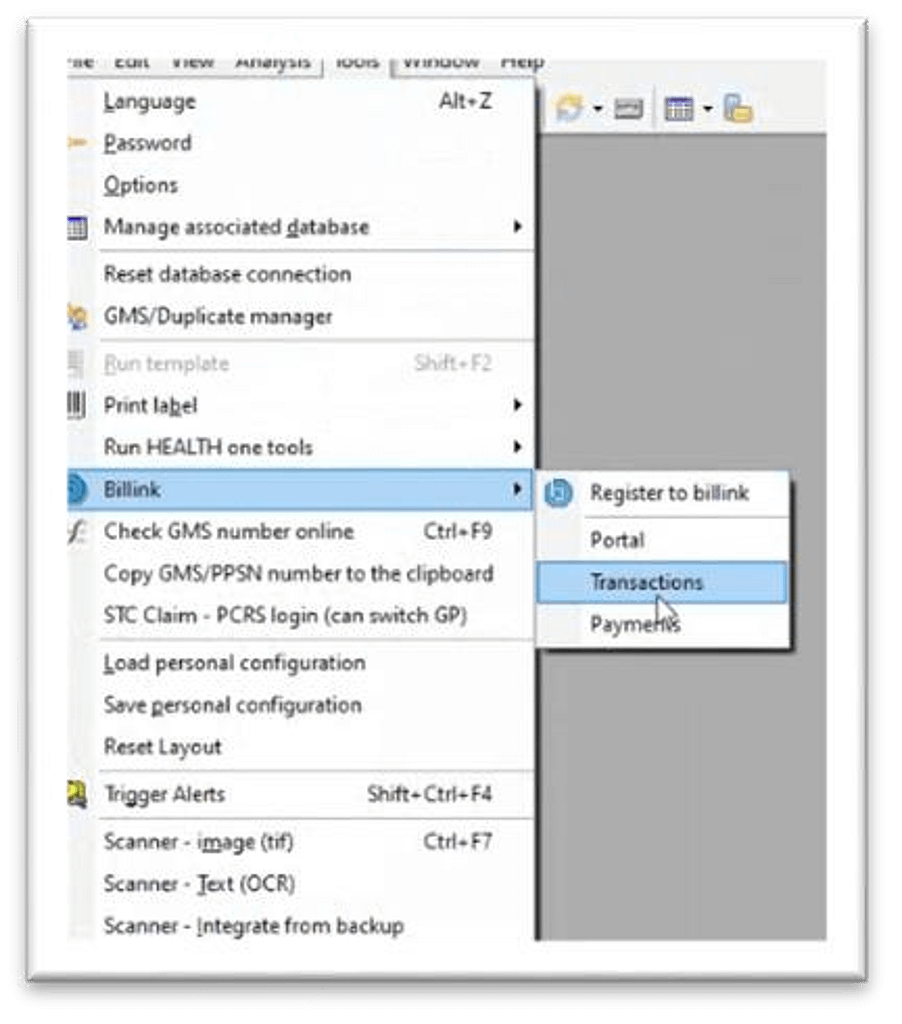
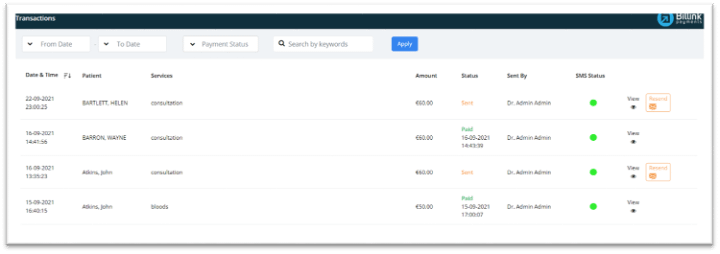
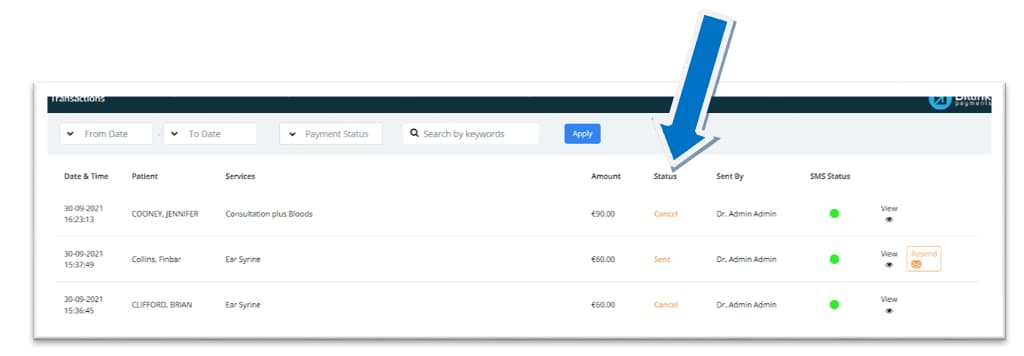
Billink Transactions will show all Billink payment transactions you have requested from Health One and their status.
From here you can monitor all of the transactions, you can filter by date, by payment status and resend the link if needed.
Billink Payments will show all batch payments made from Billink into the bank account entered at Billink registration.

PAYMENT REQUEST
Open a patient in Health One and begin a transaction as per usual, and whatever way you usually create an invoice, you will continue to do so. There is a separate document on billing that will show you how to set up automated invoices so when you begin a transaction the bill is added automatically or you can add
an invoice from the medical transaction by clicking the money icon. You can also add it from under the Billing tab.
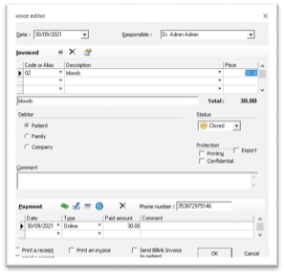
You will create an invoice in the same manner as before. You will add the Description, the Amount, choose patient/family or company depending on who you are billing.

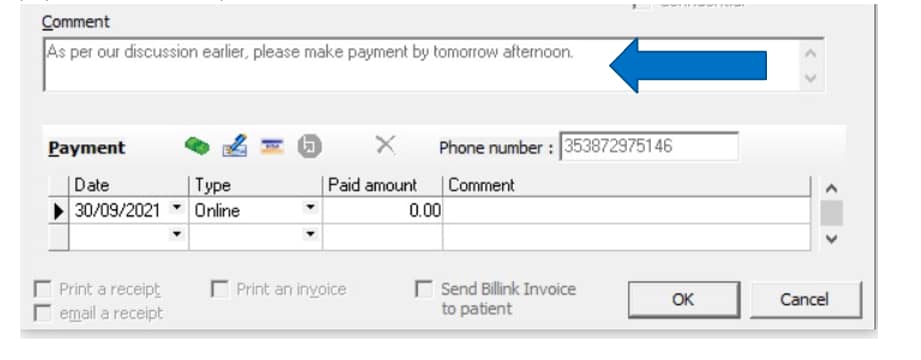
You can enter a comment for the patient in the comment section, this comment will be sent with the payment link to the patient.
Once the invoice has been created, there is a new icon under the payment section for Billink.
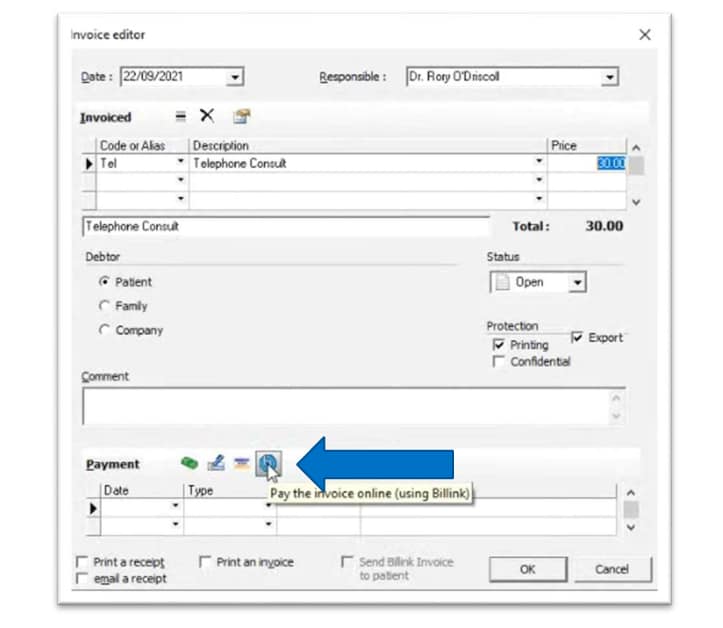
When you click this button, a payment transaction for €0.00 will be added to the payment and another field will appear with the patient’s mobile phone number. If the item TELEPHONE MOBILE has been populated in the administrative chapter it will be automatically added, if not you can add the number manually. If you manually add the telephone mobile here, it will be saved back into the administrative chapter of the patient file.
When you click OK to save, a text message will be sent to the patient. This text message is sent from
Billink so you do not need to be currently using the SMS functionality in Health One to send this message. If you are currently set up for text messaging, Billink will not use any of your text messaging credits.
Once you press OK and save, a record of the billing transaction is recorded in the patient file.

If you click back into the billing transaction, it will tell you the bill has been sent.
When the bill has been paid by the patient, the payment will be updated and the amount paid will be recorded against the invoice in the same way it would if you paid with cash or credit card. The bill status will change to closed if the bill has been fully paid. The patient’s statements will also reflect this.
PATIENTS EXPERIENCE
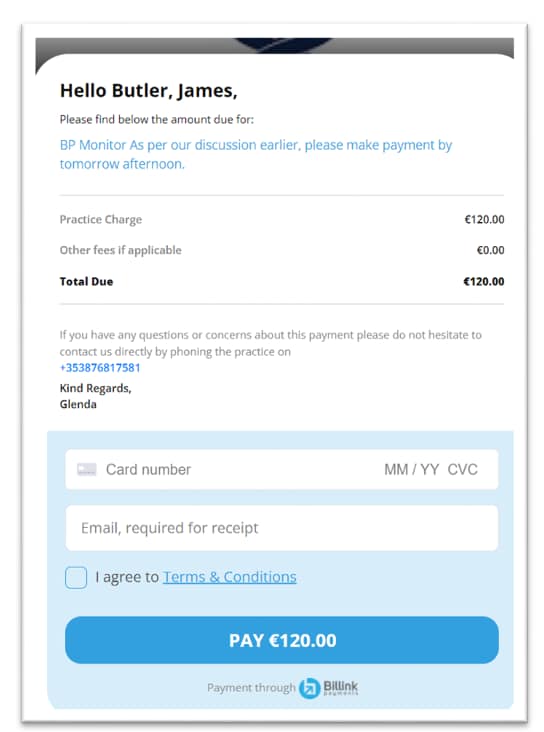
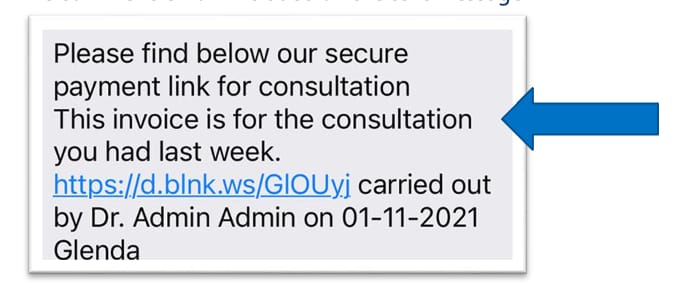
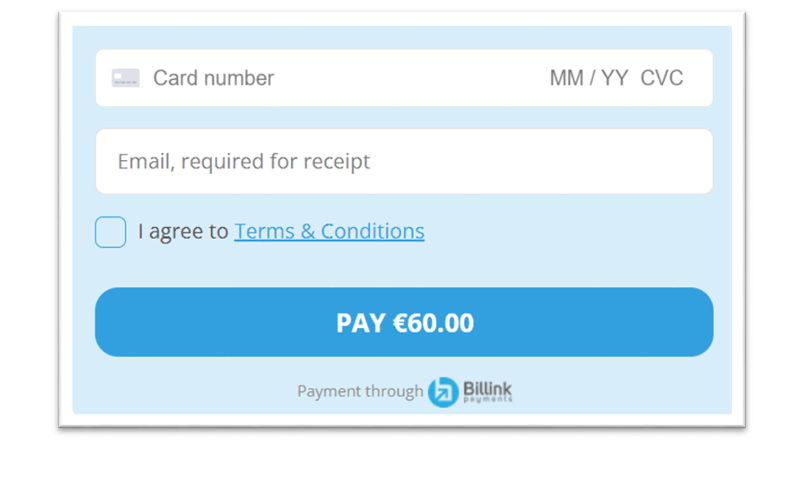
Once the patient receives the text message, they can click on the link provided in the text message. As explained above, this text message can be edited in whatever way you wish. If you added a comment to the invoice, it will appear at the top of the request.
When the patient opens the link, the comment will be displayed at the top.
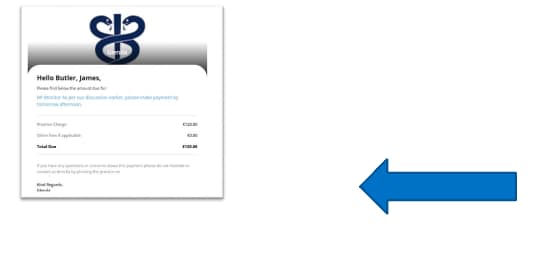
The link attached will open the payment page in their default browser. They can enter their card details, enter their email address where a receipt will be sent, they will agree to the terms and conditions and click Pay to pay the invoice.
Please Note: The card number and details are NOT saved by Billink or Health One so the patient’s details are safe and secure.
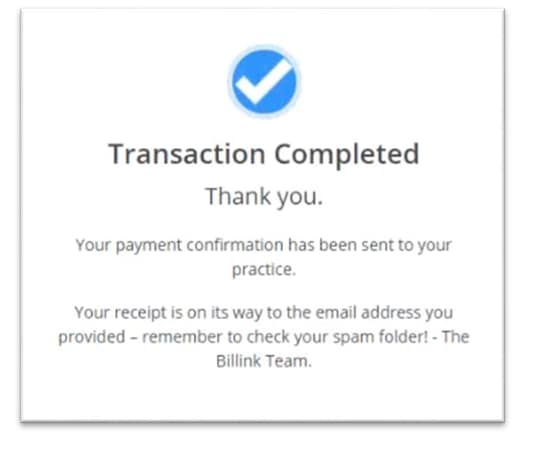
The patient will receive a confirmation message confirming the payment has been successful.
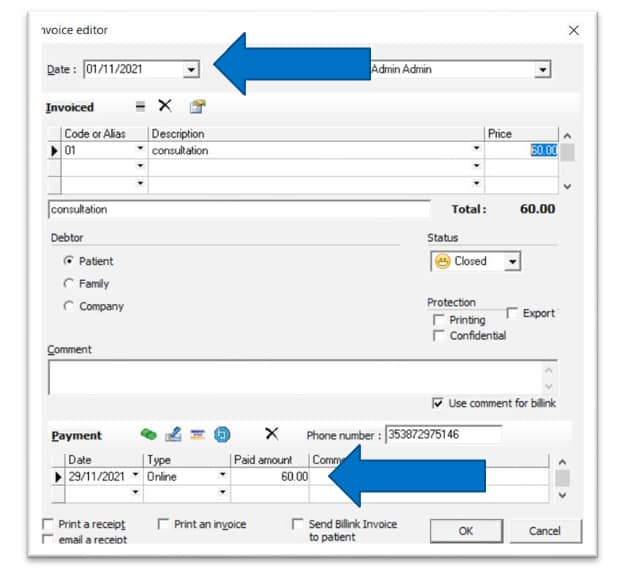
BACKDATED INVOICES
You now have the ability to backdate invoices and send this date via Billink. To do this open a patient file, and begin a transaction. Change the date of the event to a date in the past. In this example, I will add a transaction for 1st November.
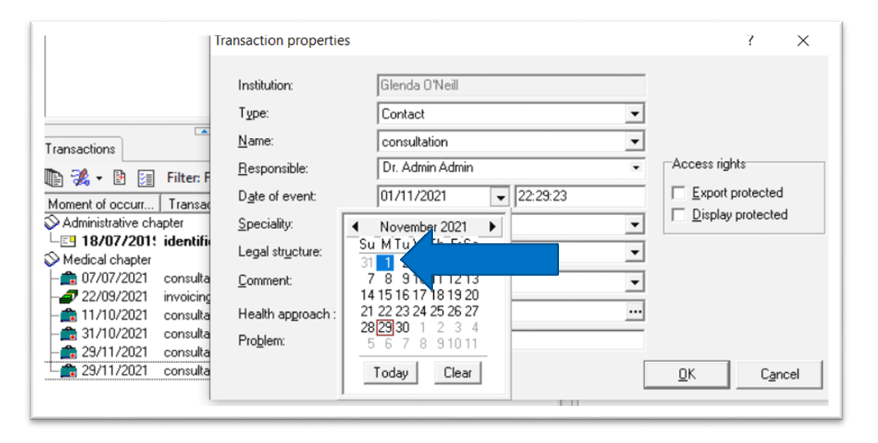
When I ‘insert an invoice’, the date is automatically backdated to the date I entered when I began the transaction. In this example I backdated the transaction to 01/11/2021 so the invoice date has automatically been set to the 1/11/2021.
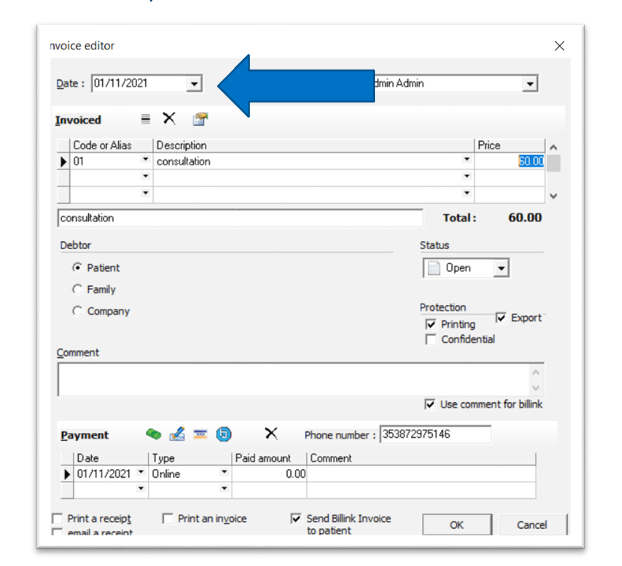
When the invoice is paid, it will be marked as paid on the date it was paid, in this example the invoice was for a consultation on the 01/11/2021 but was paid on the 29/11/2021.
The SMS Message to the patient will also display the backdated transaction date so the patient will know which service they are paying for. In this example the patient will know they are paying for their consultation from the 1/11/2021.

BILLING COMMENTS
In this version of Health One, when sending an invoice via Billink, you can now have the option to include or exclude the comment from the text message.
If you wish to send a comment with the Billink Request, open a patient file, begin a transaction and insert an invoice as before. There is a new checkbox beside the comment field when you click the Billink payment option. If you wish to include the comment, ensure the checkbox is ticked. If it’s an internal comment that you do not wish to be sent via Billink, untick the checkbox. The checkbox only appears when you choose the Billink payment option and is ticked by default.
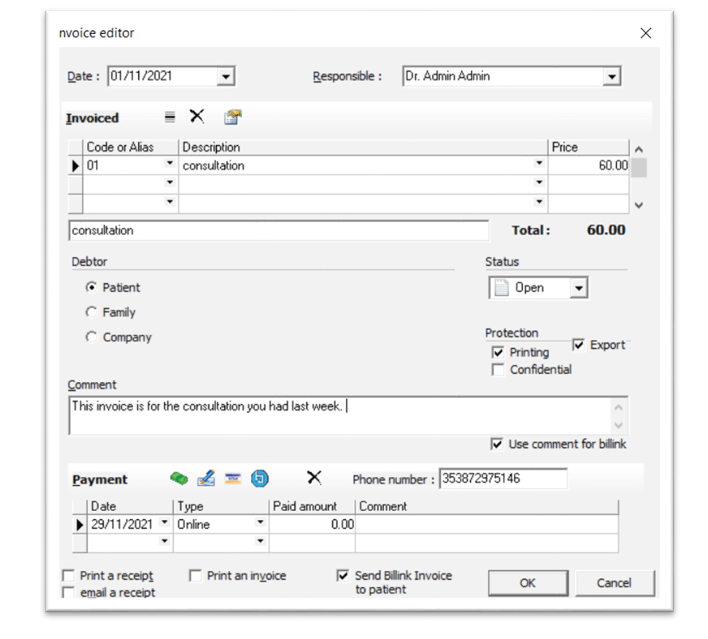
The comment is now included on the text message.
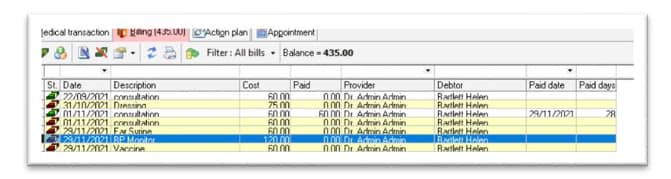
BILLINK SETTLEMENT
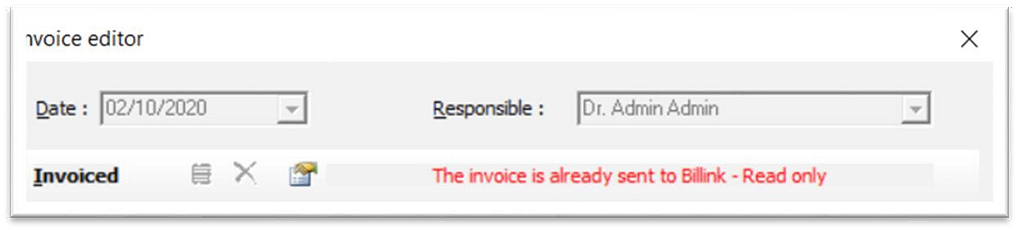
If you send an invoice via Billink but the patient does not pay using the Billink payment option but instead pays via cash or credit card in the surgery, you can now mark a Billink transaction as ‘Settled’. This will prevent any SMS reminders being sent to the patient and will mark the outstanding bill as settled. You can now mark the invoice as settled from within the invoice editor, or from the Billing tab.
To mark an invoice as settled from within the invoice editor, open the patient file, go to the Billing tab and select the invoice from the list you wish to mark as settled. Double click to open it.
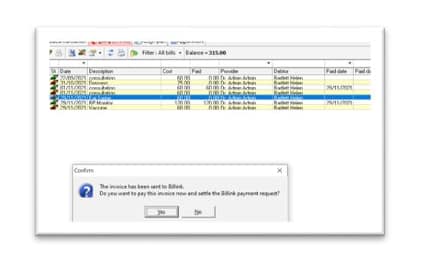
When you click the ‘cash’ or ‘credit card’ payment option prompt will appear saying the following:
‘The invoice has been sent to Billink. Do you wish to pay the invoice now and settle the billink payment request’.
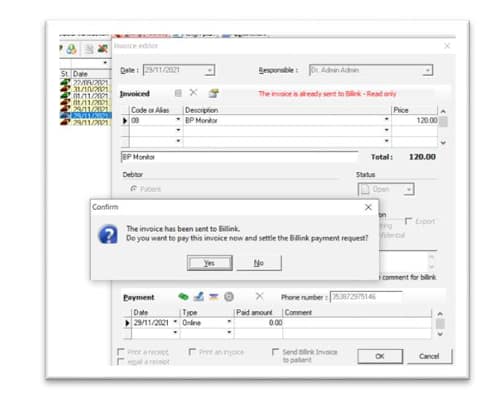
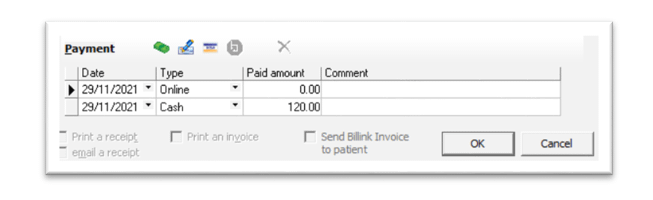
If you choose ‘yes’, the Billink transaction will be marked as settled and the cash payment will be added against the payment type.
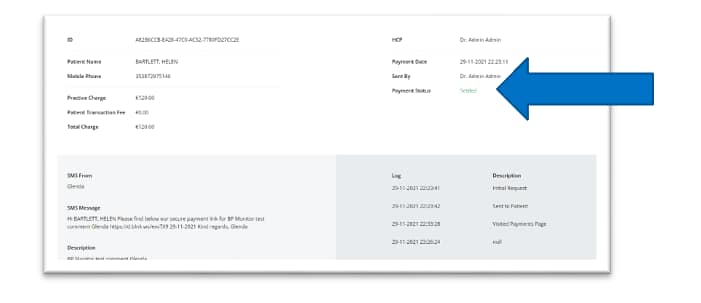
The Billink Dashboard will also be updated with a payment status of ‘Settled’ so the patient will not receive any SMS Reminders and the bill is now marked as settled.
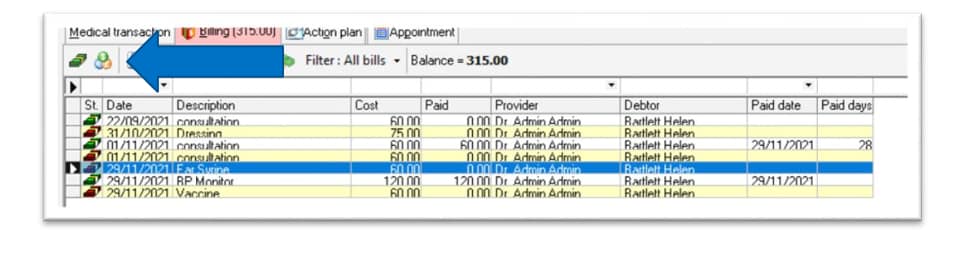
You can also settle the bill from the billing tab without clicking back into the invoice editor. Open the patient file, go to ‘Billing’, highlight the outstanding invoice on the list and click ‘payment’.
As in the invoice editor, a pop will appear asking you if you wish to settle the invoice. If you say yes, as before the bill will be marked as settled.
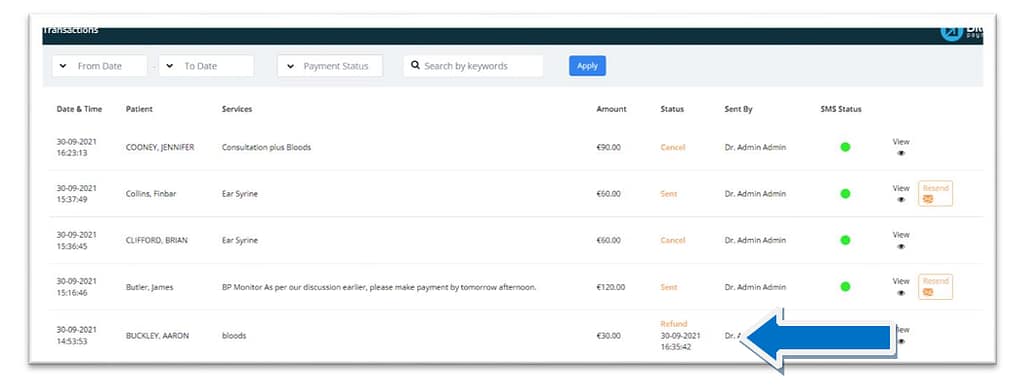
BILLINK TRACKING
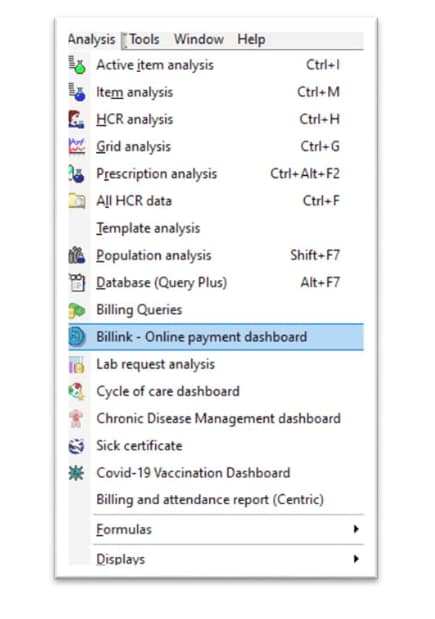
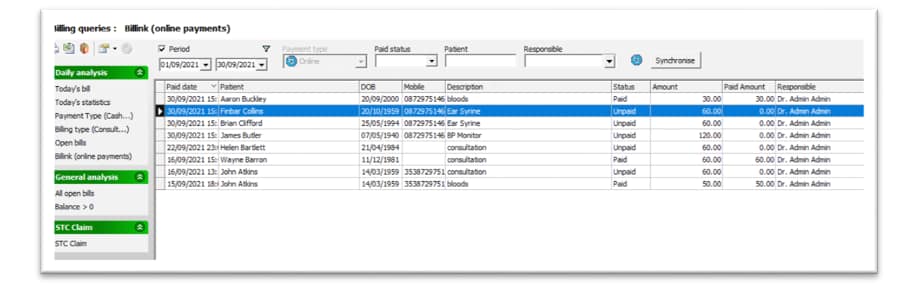
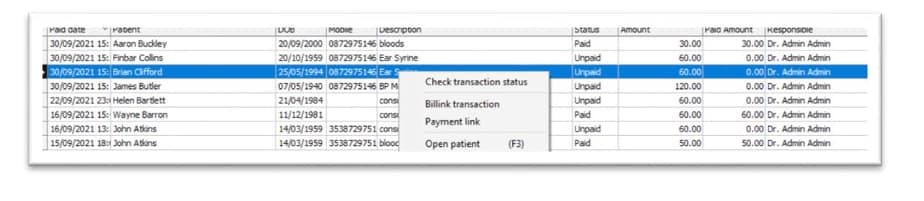
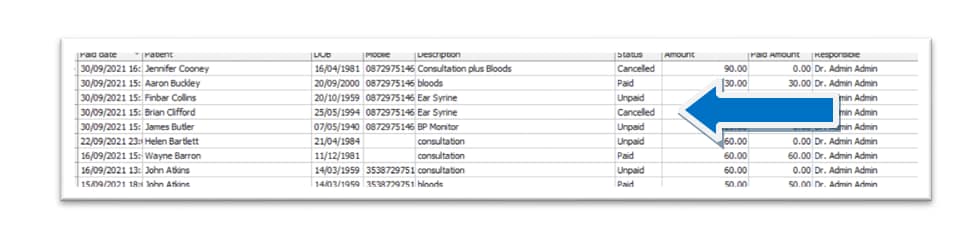
Once the patient makes payment, you will be able to track this through the Billink Portal or through the Billlink Online Payment Dashboard within Health One. You can access this through your Billing Queries or by going to Analysis, Billink, Online Payment Dashboard.
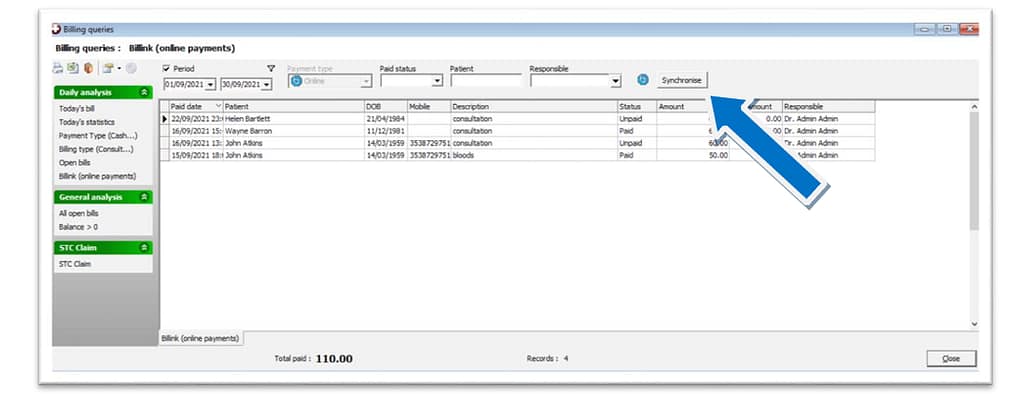
Here you will see a table with all of your online payments, you have filters at the top as you do in your regular billing queries, where you can filter by date, status, patient and responsible doctor. You can synchronise to update the status,
Please note: It will only synchronise when you open the billling dashboard or when you press the button and do it manually
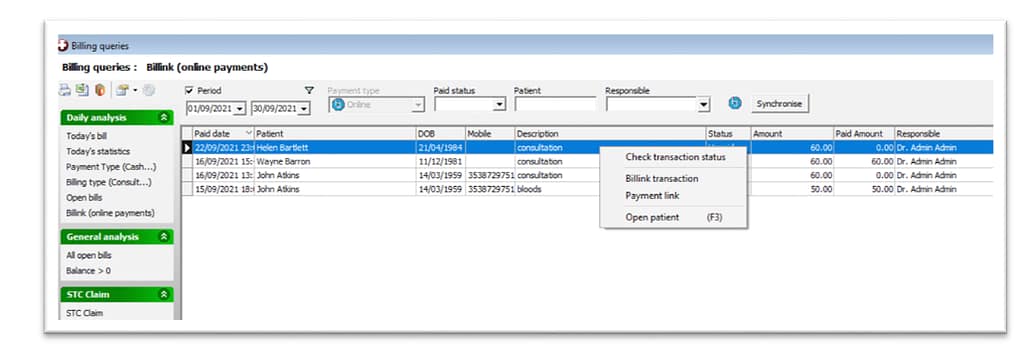
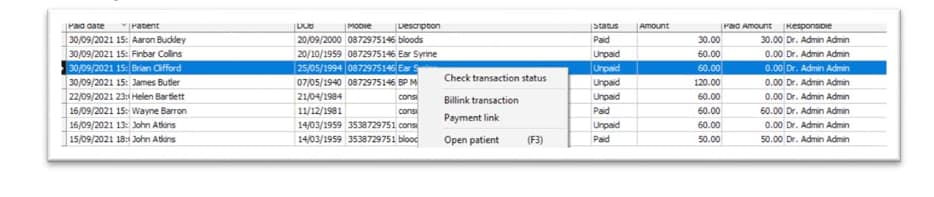
When you right click on any of the transactions, you have a number of options
- Check the status of a transaction
- Go to the Billink transaction,
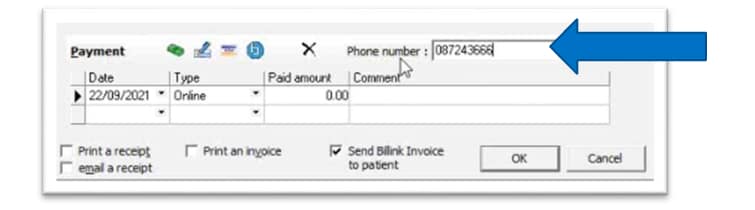
- Open a payment link (which will allow you take the payment over the phone) Open the patient file.
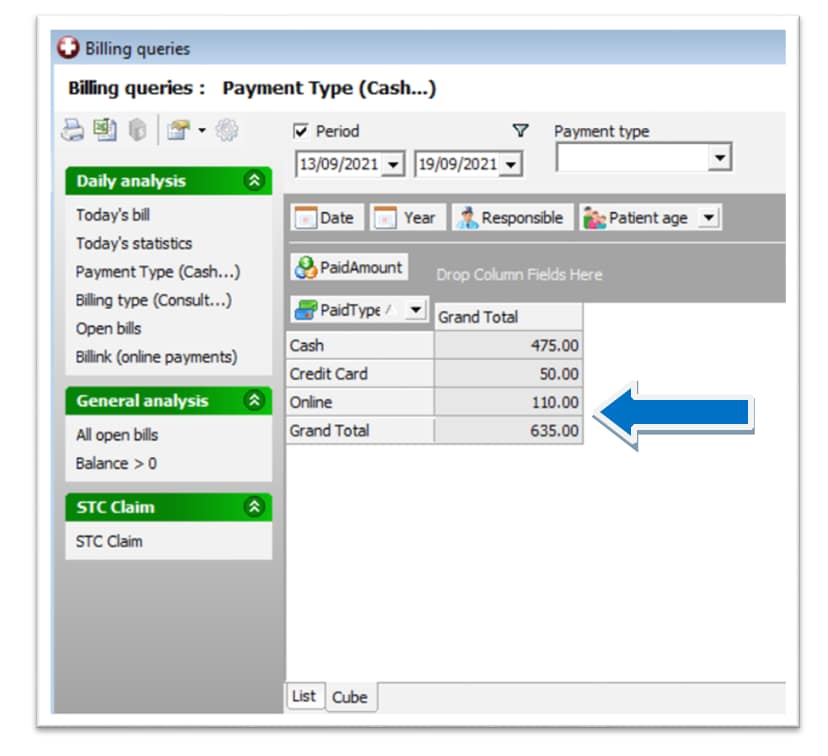
The billing Queries reports will also show you how much payments you have received online as well as Credit Card or Cash payments.
MANUALLY TAKING PAYMENT OVER THE PHONE
Once you have sent a Billink Invoice to the patient, and you need to take the payment manually over the phone or in-person, you can do this by going to Billlink Online Dashboard,(Analysis, Billink, Online Payments Dashboard).
Here you will see a list of all your Billink invoices/payments as explained above. To take the payment manually, find the patient on the list and right click
Click Payment Link
This will open up the payment link, (the same payment link the patient receives by text message)
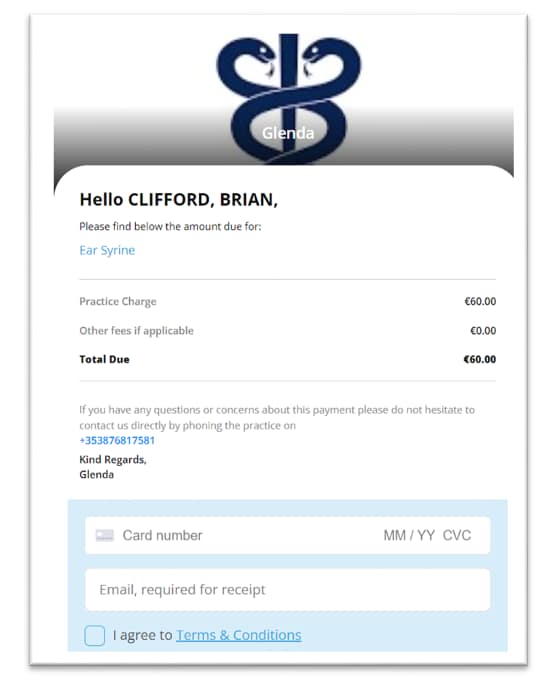
You can take their card details, and manually enter them and click Pay to pay the invoice. It will act in the same way it would if the patient had made payment. (The invoice will be updated and marked as paid in the same way as before in the patient file, Billink Portal will be updated etc)
CANCELLING AN INVOICE
To cancel an invoice, go to Billlink Online Dashboard,(Analysis, Billink, Online Payments Dashboard). Find the patient on the list, right click on them and select Billink Transaction.
From here, you can press the cancel button to cancel the invoice.

You can add a reason for the cancellation, then click Submit to cancel.
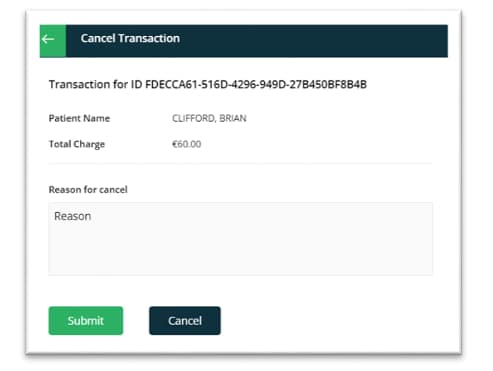
A message will be returned indicating the transaction has been successfully cancelled.

When you sync in Health One, a message will be displayed with the updated status.

The transaction will show as cancelled in the Dashboard.

To cancel from within the patient file, highlight the invoice, right click and select cancel invoice.
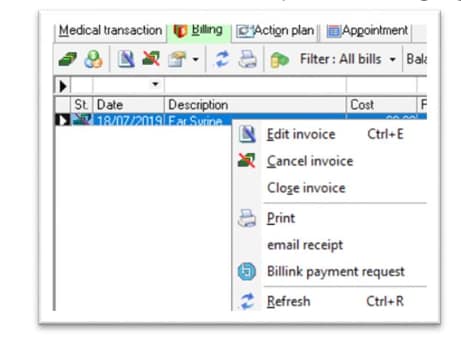
The status of the invoice will chance to cancelled, and the Dashboard and Billink Portal will be updated to with the new status.

REFUNDS
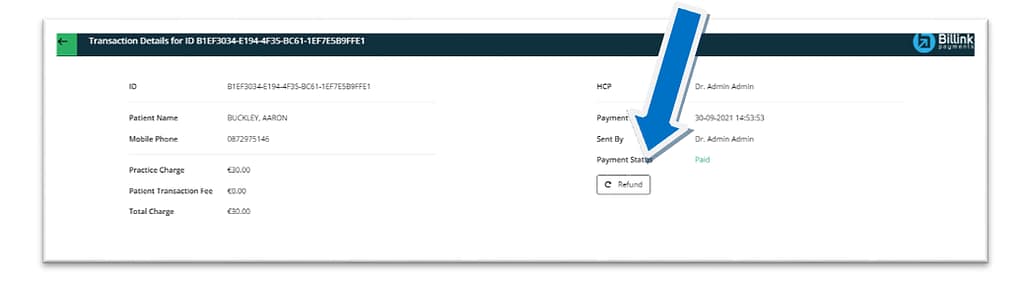
To refund a patient, go to Billlink Online Dashboard, (Analysis, Billink, Online Payments Dashboard). Find the patient on the list, right click on them and select Billink Transaction.
You will be presented with the patient’s transactions details, and there is a refund button at the bottom. Click Refund
You will be asked for a reason for the refund, enter the reason and click Submit.
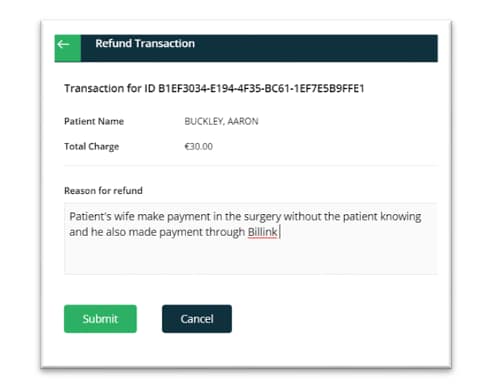
The transactions table in Billink will be updated with the refund status.
The Billlink Online Dashboard, (Analysis, Billink, Online Payments Dashboard) will also be updated with the new status.

GROUP CHARGES
To send a request to a patient for a number of unpaid invoices, open the patient file, go to Billing, and highlight the selected invoices, right click and select Billing Payment Request.
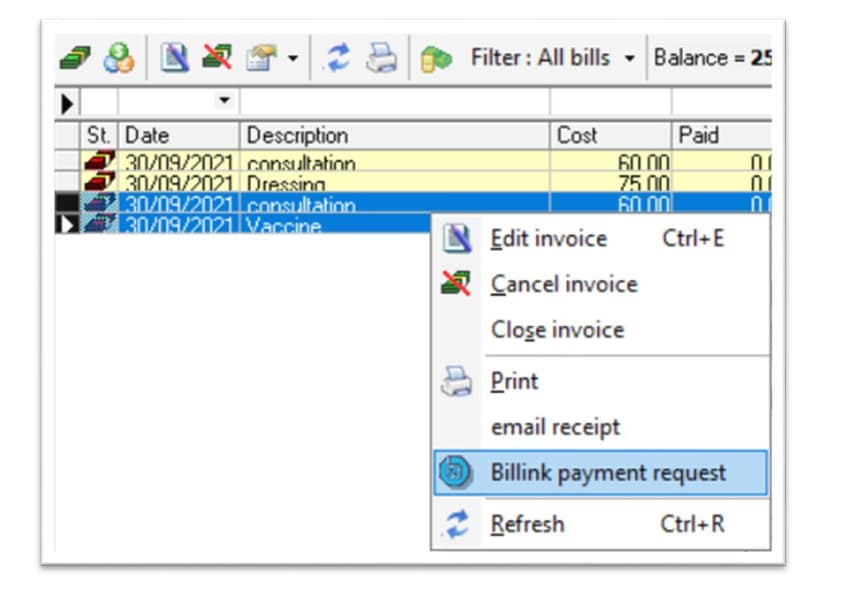
A Billing Payment Request will be generated for the patient for all the invoices selected on the list and the total amount of all combined invoices will be requested in one transaction.
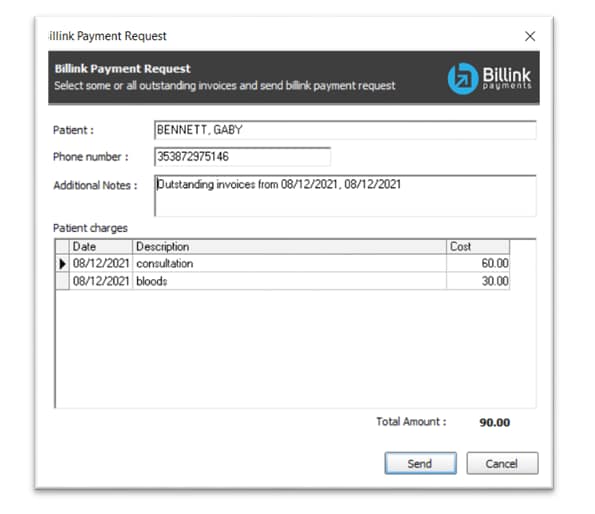
The patient will receive a request for all outstanding invoices within a certain date range.
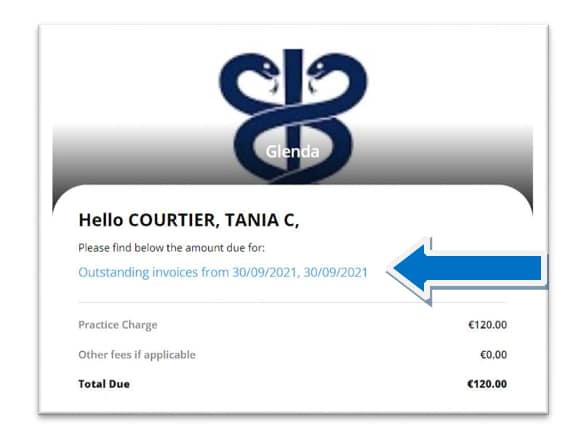
They can then pay the invoice in the same manner as before. The Billink Dashboard and Health One Portal will be updated in the same manner as it would if a single invoice was paid by the patient.

Technical Trainer at Clanwilliam Health