Jun 06, 24
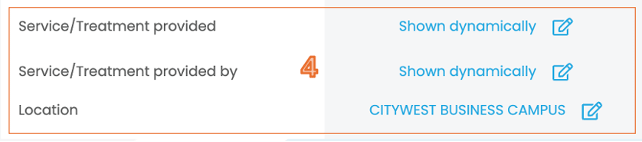
Customise your Receipts
Customise your Receipts
You can now personalise your Billink Receipts in lots of different ways.
Where do you go to make these changes?
Click on the Settings Tab and then on Receipts

There are a 5 different areas where you can make changes to your Receipt
Section 1 – The Logo/Branding Section
Section 2 – The ‘Top Note’ Section
Section 3 – The Practice Header Section
Section 4 – The Transaction/Service Section
Section 4 – The Transaction/Service Section
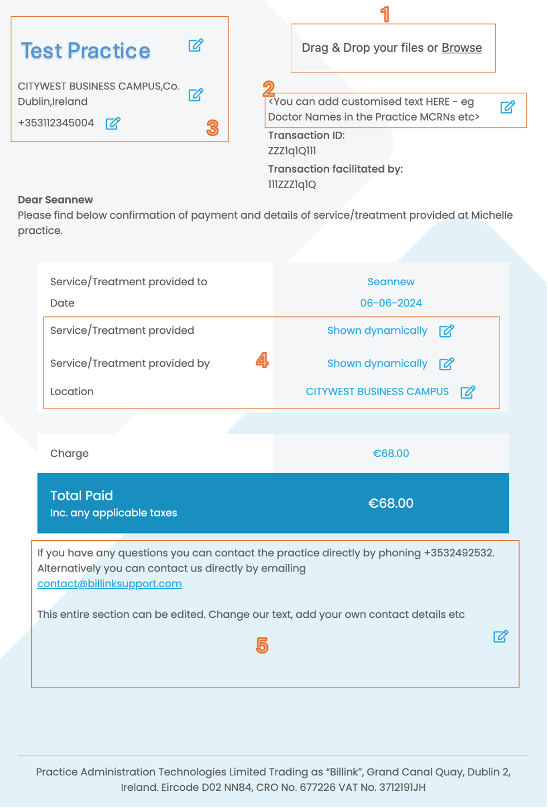
- Section 1 – The Logo/Branding Section
Click on this section to upload your own logo (or practice image) directly to your receipt. You can change this at any time. If you remove your logo or image later we’ll replace it with our default Billink icon.
- Section 2 – The ‘Top Note’ Section

Click the blue edit button to add your own text here. It’s a useful areas to add information like names of doctors that work in the practice, their MCRNs, special details about your service etc. You can change this at any time.
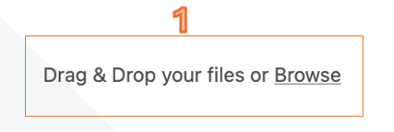
- Section 3 – The Practice Header Section

You’ll note when trying to change the practice name or phone number we’ll direct you to the main practice settings page to change these. The reason for this is that just for security reasons we’ve implemented an OTP (one time password) passcode requirement. If you need any help with a practice name or phone number change you can message us at contact@billinksupport.com and we’ll help you get that OTP set up if not already
For the practice address you can opt to show or hide each line of the address. Clicking on the address section will show the following options:
For each line of the address you can decide if you want to show that (or not). For practices that run multi locations they might prefer to hide the address here and hard code it in on of the text sections (Section 2, Section 5) or hard code it into the ‘Location’ line in Section 4.
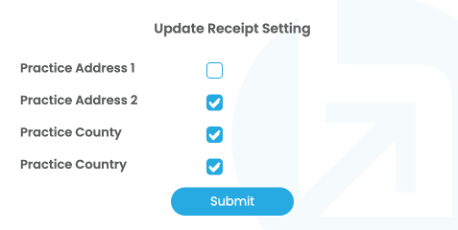
- Section 4 – The Transaction/Service Section
So this section has until now been dynamically (automatically) filled by the details we receive from the GP or Consultant practice system. You can now change these values to ‘hard coded’ – meaning they wont change, they’ll stay fixed for all receipts.
For example – for Service/Treatment provided, by default its sent to show dynamically (will show what ever was on the charge created in your system)
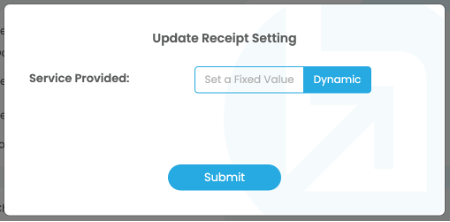
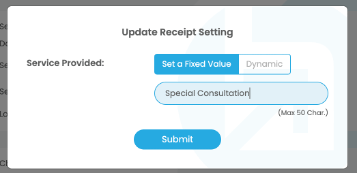
But you might decide that for whatever reason you’d like it to be set with a fixed value like ‘Consultation’ for all receipts. This is probably not that relevant for most clinics, but may be for some specialised clinics or consultant clinics where the same type of consultation is provided each time and perhaps you want to include some reference code for insurance companies etc.
To set a Fixed Value for this simple toggle to that option, type in your value and hit Submit. The change will be instant and applied to all receipts. You can revert back at any stage by toggling back to Dynamic and again hitting Submit
Service/Treatment Provided By:
You can do the same for the staff name providing the service. You may wish to default this to a particular provider from now on.
Location:
You can set a fixed location here independent to the address in Section 3. So for sites that run multiple clinics but from the same instance of their system they may put down a business name here – for the main location and opt not to display the location in Section 3.
- Section 5 – The Bottom Text Section
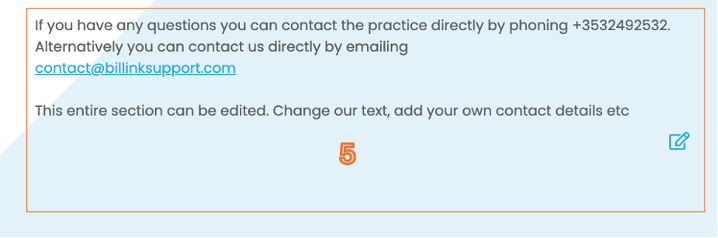
You can amend the entire text in this section. Add details about your service, add contact details etc. Click the edit icon, put in your changes and hit submit. These changes will be applied to all Receipts.
Founder ,
Billink Payments